
3 Tips for Prototyping in Figma Like an Expert
This time, we share some tips that have helped Pixel506’s designers get ahead while learning to prototype on Figma. We build prototypes for different purposes: presenting realistic designs to clients, user testing, or communicating ideas to developers. Prototypes allow people to engage, experience, and understand how a design will function in real life.
Ideally, building a prototype should be easy and straightforward, enabling better and faster communication between parties. With these tips, you’ll be an expert prototype creator in no time!
1. Use master components to make faster prototype connections
When working on web projects, we often repeat elements on different screens of our product. A navigation bar, for example, may appear on multiple pages. The traditional way to do this is to link each item on every screen so it appears in a specific frame. But let’s say you have 20+ screens to link an item to; this process becomes tedious and time-consuming.
Luckily, there’s a better, quicker way to link repetitive elements. When starting a project, turn your repetitive element into a component. Once you do this, link the items needed inside this component to the corresponding frame. Then, add different instances of this component on each screen, and all the connections you made before will automatically be there.
Keep in mind this method won’t work if you’re bringing a component instance from a team library because the master component would be located in a different file. In this case, the solution is to create a new master component out of the instance brought from another file. Detach the instance from the master and turn it into a new master in your working file.
2. Animate your prototypes using GIFs
GIFs are a simple way to make your designs more dynamic and realistic. They can be subtle animations such as loadings or a moving element on the screen. To add a GIF, you simply need to add a .gif file to Figma; it will behave as a regular image when you edit the design. When you’re ready to test, just open presentation mode, and the GIFs will come to life.
Remember, you won’t be able to see the motion in GIF files while in editing mode. If your GIF starts off with a blank frame, or if you have different GIFs with the same first frame animation, you can change the cover frame in the image properties panel on the right-side menu.

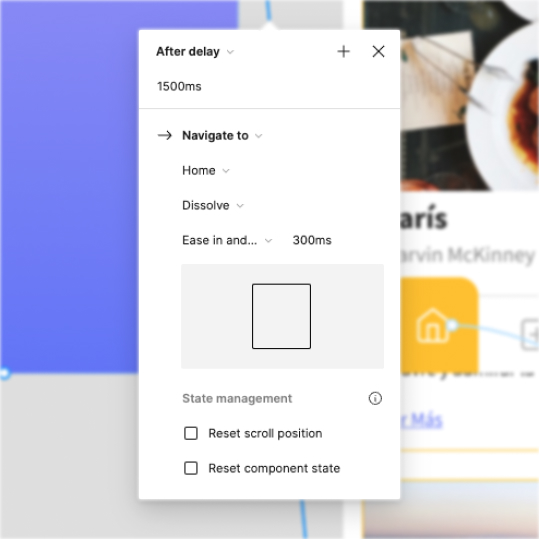
3. Use time delays to simulate interactions
In existing digital products, there’s almost always a slight delay in the response time of a product after a user sends a command. If a prototype reacts instantly, it can feel strange for users. For example, in a real-life product, a user fills in a form, and once they click “Submit,” the software will take some seconds to submit and store the information. If the submission process happens too fast, the user may feel a little disoriented, as the prototype won’t feel like a real-life product.
The easiest way to remedy this is to use an after-delay trigger. This delays the interaction for a set duration. As a result, the prototype functions like an actual product.
And that wraps up our short tour through our top three tips when starting out with prototypes in Figma. We hope they helped streamline and improve your process. Good luck with your next prototyping project!
Keep it Coming
The topics covered in our newsletter have organically grown out of conversations with our clients, teams, and friends. We hope each article helps solve a problem, sparks discussion, and creates community. We base our articles on your questions and inquiries and always look forward to hearing from you! Let us know if you have any special requests or suggestions for future articles— you can reach us at [email protected]. We’re here to help!